Attention: Confluence is not suitable for the storage of highly confidential data. Please ensure that any data classified as Highly Protected is stored using a more secure platform.
If you have any questions, please refer to the University's data classification guide or contact ict.askcyber@sydney.edu.au
Getting started submitting jobs to Artemis from MATLAB
- Stephen Kolmann
Get an Artemis Account
You need Artemis access before you can submit jobs to Artemis using your Matlab client.
Install Matlab R2017a or Matlab R2018a
Only Matlab R2017a or Matlab R2018a can submit Matlab jobs to Artemis, so you will need to install one of these two versions on your computer. The University of Sydney has a site license for Matlab and provides access to this license at no cost to Sydney University researchers. You can download and install Matlab from the Softserv website or Mathworks.
Import the Artemis cluster profile
The Artemis cluster profile is a set of Matlab scripts provided by the University that tells your Matlab client how to submit jobs to Artemis. Follow these instructions to import the Artemis cluster profile into your Matlab client:
- Download the Artemis integration scripts.
- Extract the downloaded zip file. In the downloaded package, you should have an Artemis-R2017a.settings file, an Artemis-R2018a.settings file and a directory called artemis-integration-scripts.
- Open Matlab on your computer.
- In the Matlab client, click the Home tab, select Parallel, then select Manage Cluster Profiles.
- In the Cluster Profile Manager, click the Import button and select the Artemis-R2017a.settings file if you're using Matlab R2017a, or the Artemis-R2018a.settings file if you're using Matlab R2018a.
If you successfully imported the Artemis cluster profile, you should see a new cluster profile called Artemis in the Cluster Profile manager.
Artemis cluster profile configuration
The imported Artemis cluster profile needs additional configuration before use. Follow the steps below to complete the configuration:
- Select the imported Artemis cluster profile in the Cluster profile manager window.
- Click the Edit button, either in the lower-right hand corner, or in the menu bar at the top of the window.
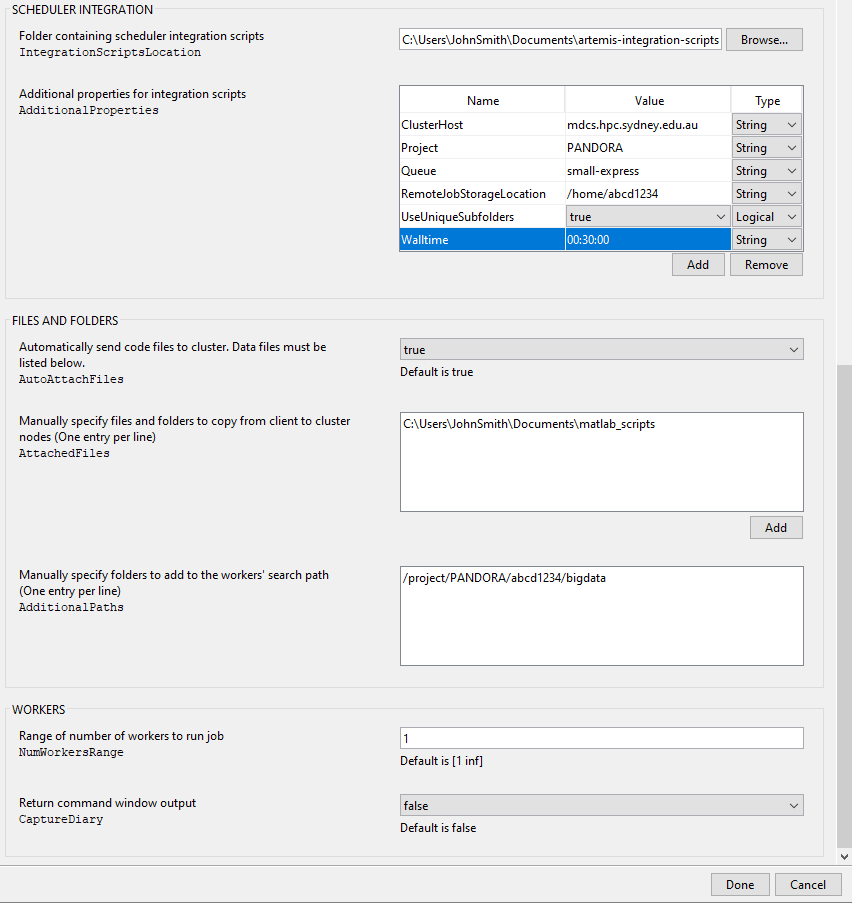
- In the Scheduler Integration section, set the Folder containing scheduler integration scripts option to the path to the artemis-integration-scripts folder you extracted earlier.
- In the additional properties for integration scripts section:
- Set
Projectto your abbreviated project name as specified in your RDMP. - Set
RemoteJobStorageLocationto a directory on Artemis where you would like your job’s files to be stored. For information about Artemis storage, see the storage section of the Artemis user guide. - Adjust the
Walltimeoption to a value appropriate for your job. Walltime is the maximum amount of time your job will run on Artemis. If your job exceeds this walltime, it will be terminated and you will lose all unsaved progress. It is best to overestimate the walltime if you are unsure of how much you need. - Other valid options are:
Mem: the amount of RAM (memory) your job needs. It is best to allocate a few gigabytes more than you expect to use.Ngpus: the number of GPUs required. The maximum you can request is two. Only use this option if you know your job can use GPUs.Queue: the Artemis job queue your job will be placed in. If you are unsure of what these are, leave it blank. See the Artemis user guide for information about Artemis queues.AdditionalSubmitArgs: Additional PBS options for your submitted job.
- Set
Matlab cannot submit jobs to the scavenger queue. Jobs submitted to scavenger will be rejected with an error.
- In the Files and Folders section, in the AttachedFiles option, you may specify a directory or multiple directories on your local computer that will be copied to Artemis before your job starts. You may leave this blank if not required.
- In the AdditionalPaths box in the Files and Folders section, you may specify a folder or multiple folders on Artemis that contains input files needed for your job that you copied to Artemis in advance. You may leave this blank if not required.
- When you have finished editing the Artemis cluster profile, click “Done” in the bottom right-hand corner of the window.
A sample Artemis cluster profile is shown below:
Validate the Artemis cluster profile
To ensure the Artemis cluster profile is working, run the Cluster profile Validation:
- Select the Artemis Cluster Profile in the Cluster Profile manager, then Click the “Validate” icon in the menu bar at the top of the Cluster Profile Manager.
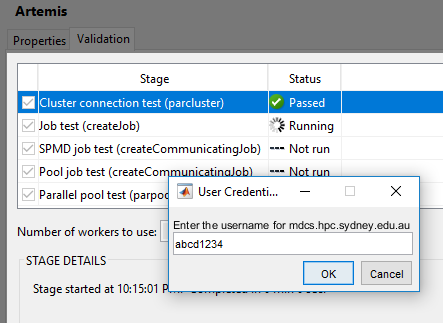
- The validation window will appear. Before the validation tests can run, you must Authenticate to Artemis.
- First, enter your UniKey in the “Enter the username for mdcs.hpc.sydney.edu.au” box, then click OK.
- Next, when it asks if you wish to use an identity file to login to mdcs.hpc.sydney.edu.au, answer No.
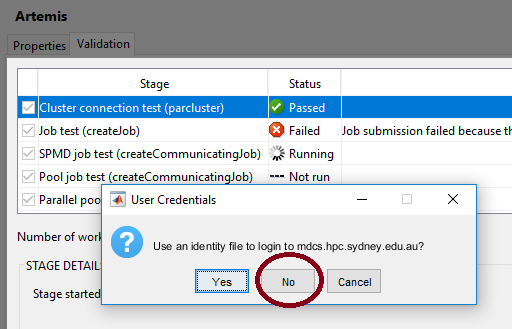
- Finally, enter your password in the next dialog box, then click OK.

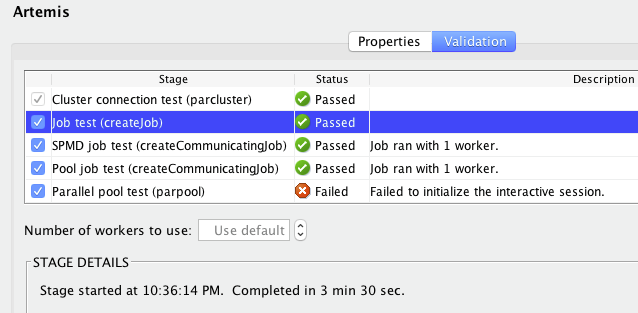
- If the test was successful, all tests should pass except the “Parallel pool test (parpool)”.
R2017a validation failure bug fix for Linux users
The Matlab R2017a cluster profile validation on Linux fails with a rather cryptic error about timezones and a script called datetime.m. If you encounter this bug, you can either use Matlab R2018a, which has fixed this bug, or you can follow the below steps:
- Back up your
datetime.mfile. The path todatetime.mis:
MATLABROOT/toolbox/matlab/timefun/@datetime/datetime.m
where MATLABROOT is the directory where Matlab R2017a is installed on your computer.
2. Download the datetime_FIXED.m file by right-clicking the link and selecting "Save Link As..." (or equivalent for your web browser version) and rename it to datetime.m.
3. Copy the datetime.m file you just renamed in step 2 to:
MATLABROOT/toolbox/matlab/timefun/@datetime/datetime.m