Attention: Confluence is not suitable for the storage of highly confidential data. Please ensure that any data classified as Highly Protected is stored using a more secure platform.
If you have any questions, please refer to the University's data classification guide or contact ict.askcyber@sydney.edu.au
1. Git basics
- Stephen Kolmann
How do I get set up to use Git?
When we use Git on a new computer for the first time, we need to configure a few things. Below are a few examples of configurations we will set as we get started with Git:
- our name and email address,
- to colorize our output,
- and that we want to use these settings globally (i.e. for every project)
$ git config --global user.name "Your name"$ git config --global user.email "user@email.com"$ git config --global color.ui true
- Creating our project directory
$ mkdir git_tutorial$ ls git.ipynb git_tutorial $ cd git_tutorial $ pwd /Users/rafaelpossas/git_tutorial/git_tutorial
Creating a new, empty repository
A repository is the official place where you store all your work. It keeps track of your tree, by which means all your files, as well as the layout of the directories in which they are stored.
A filesystem is two-dimensional: Its space is defined by directories and files. In contrast, a repository is three-dimensional: It exists in a continuum defined by directories, files and time. A version control repository contains every version of your source code that has ever existed.
$ git initInitialized empty Git repository in /Users/rafaelpossas/git_tutorial/git_tutorial/.git/
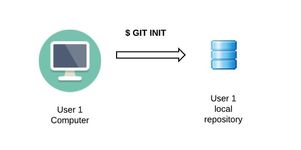
- As you can see git created a .git directory inside your folder. This directory is where the metadata of your repository is stored (more on this later)
For now you have a local instance of your repository that is not shared with anyone, basically you are saying to your local computer that you want all files and directories changes to be tracked by GIT.
Adding your first file to the repository
- Creating a file with some text
$ echo > GIT_TUTORIAL.txt "This is my first GIT File"
- Showing the output of the file
$ cat GIT_TUTORIAL.txt
This is my first GIT File
Staging area and Status Command
Now that we have a new file in our directory we can check the status of our repository using the $ git status command
$ git status On branch master Initial commit Untracked files:
(use "git add <file>..." to include in what will be committed) GIT_TUTORIAL.txt
nothing added to commit but untracked files present (use "git add" to track)
Our file is shown as untracked, which means that git is not watching for any changes to the file
Adding the file to the staging area
$ git add GIT_TUTORIAL.txt $ git status On branch master Initial commit Changes to be committed: (use "git rm --cached <file>..." to unstage)
new file: GIT_TUTORIAL.txt
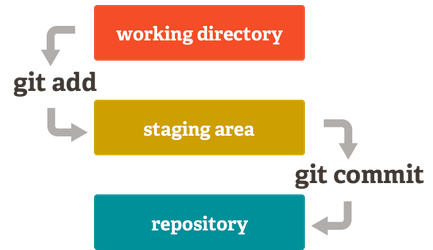
- Staging is a step before the commit process in git. That is, a commit in git is performed in two steps: staging and actual commit. As long as a changeset is in the staging area, git allows you to edit it as you like (replace staged files with other versions of staged files, remove changes from staging, etc.). The file is no longer untracked and it is ready to be commited to our current local repository.
Commit the file for the first time
$ git commit -m "My first git commit"
[master (root-commit) c7d8e7a] My first git commit
1 file changed, 1 insertion(+)
create mode 100644 GIT_TUTORIAL.txt
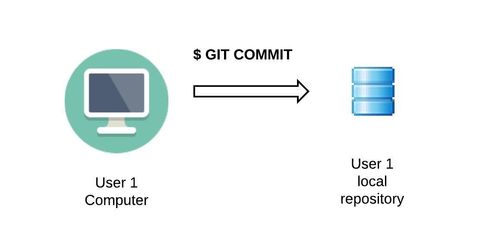
- This is the operation that actually modifies the repository. Several others modify the working copy and add an operation to a list we call the pending changeset, a place where changes wait to be committed.
- The commit operation takes the pending changeset and uses it to create a new version of the tree in the repository.
- It is required that a log message (or comment) is provided when you commit
- The message should explain the changes you have made. This log message becomes part of the history of the repository.
- A hash id was created by our commit as a unique identifier of the operation (more on hash later)
Accessing our repository timeline
$ git log commit c7d8e7ac9608dde2868b1e6bd1eaee222fbeba8b Author: Rafael Possas <rafael.possas@sydney.edu.au> Date: Fri May 26 11:22:05 2017 +1000 My first git commit
- The first lines shows the unique hash identifier of our commit
- Second line shows the author of the commit (as it was configured in our setup process)
- Date and Commit message are shown in the last 2 lines
Some commands examples for adding files to the staging area
$ git add <list of files> # Add the list of files
$ git add --all           # Add all files
$ git add *.txt           # Add all txt files in current directory
$ git add docs/*.txt      # Add all txt files in docs directory
$ git add docs/           # Add all files in docs directory
$ git add "*.txt"         # Add all txt files in the whole project
Git Diff Command
- Adding a new line to our file
$ echo "Understanding the DIFF command in git" >> GIT_TUTORIAL.txt
- Verifying the content of the file
$ cat GIT_TUTORIAL.txt
This is my first GIT File
Understanding the DIFF command in git
- Applying the DIFF command
$ git diff
 diff --git a/GIT_TUTORIAL.txt b/GIT_TUTORIAL.txt
 index 2f5afae..bfc5e57 100644
 --- a/GIT_TUTORIAL.txt
 +++ b/GIT_TUTORIAL.txt
 @@ -1 +1,2 @@
 This is my first GIT File
+Understanding the DIFF command in git
- Shows the details of the modifications that have been made to the working copy.
- Status provides a list of changes but no details about them. To see exactly what changes have been made to the files, you need to use the diff operation. Your VCS may implement diff in a number of different ways. For a command-line application, it may simply print out a diff to the console. Or your VCS might launch a visual diff application.
- Helps to understand differences in a file within your repository
- Lets check the status of our files
$ git status
On branch master
Changes not staged for commit:
  (use "git add <file>..." to update what will be committed)
  (use "git checkout -- <file>..." to discard changes in working directory)
modified: GIT_TUTORIAL.txt
no changes added to commit (use "git add" and/or "git commit -a")
The changes are shown as untracked, in other words, not yet on staging area
- Adding the file with the changes to the staging area
$ git add GIT_TUTORIAL.txt
- Running DIFF again
$ git diff
This time it shows no differences, because now the file is already STAGED and ready to commit
$ git diff --staged     # shows the differences for files already in staging area
 diff --git a/GIT_TUTORIAL.txt b/GIT_TUTORIAL.txt
 index 2f5afae..bfc5e57 100644
 --- a/GIT_TUTORIAL.txt
+++ b/GIT_TUTORIAL.txt
 @@ -1 +1,2 @@
 This is my first GIT File
+Understanding the DIFF command in git
- Now we can see the same changes for when the file was outside of the staging area
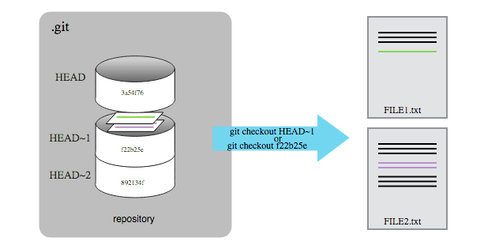
Git HEAD and Discarding/Unstaging Changes
Image from Software Carpentry (https://swcarpentry.github.io)
$ git status On branch master Changes to be committed:
(use "git reset HEAD <file>..." to unstage)
modified: GIT_TUTORIAL.txt
- File is shown as modified and it is in the staging area
$ git reset HEAD GIT_TUTORIAL.txt
Unstaged changes after reset:
M GIT_TUTORIAL.txt
$ git status
On branch master
Changes not staged for commit:
(use "git add <file>..." to update what will be committed)
(use "git checkout -- <file>..." to discard changes in working directory)
modified: GIT_TUTORIAL.txt
no changes added to commit (use "git add" and/or "git commit -a")
The file is no longer in the staging area
 What if we wanted to discard all our changes?
- We can always go back to the last state of our working copy and discard all our current changes.
- In order to achieve this we need to checkout our last file version which as explained above is the HEAD version.
- If we wanted to save our local changes in a safe place in case we decide to go back to them later we can use the stash command, more information can be found in here.
$ git checkout -- GIT_TUTORIAL.txt
$ git status
On branch master
nothing to commit, working tree clean
$ git log
commit c7d8e7ac9608dde2868b1e6bd1eaee222fbeba8b
Author: Rafael Possas <rafael.possas@sydney.edu.au>
Date: Fri May 26 11:22:05 2017 +1000
My first git commit
- Our file now is back to the same state it was since our last commit
$ cat GIT_TUTORIAL.txt This is my first GIT File
- Skip staging and Commit
$ echo "Understanding the DIFF command in git" >> GIT_TUTORIAL.txt
$ git commit -a -m "Understanding Diff"
[master e58dbad] Understanding Diff
1 file changed, 1 insertion(+)
- Whoops, we forgot something on that commit, and now?
$ git logcommit e58dbad79723a437fbcade50bebe4a3ddeb18794
Author: Rafael Possas <rafael.possas@sydney.edu.au>
Date: Fri May 26 11:42:26 2017 +1000
Understanding Diff
commit c7d8e7ac9608dde2868b1e6bd1eaee222fbeba8b
Author: Rafael Possas <rafael.possas@sydney.edu.au>
Date: Fri May 26 11:22:05 2017 +1000
My first git commit
$ cat GIT_TUTORIAL.txtThis is my first GIT FileUnderstanding the DIFF command in git
$ git reset --soft HEAD^
MOVE TO COMMIT BEFORE HEAD (In this case our FIRST commit)
- The '^' means one version before head, therefore, ^^ would mean two versions before head and so forth
$ git statusOn branch master
 Changes to be committed:
  (use "git reset HEAD <file>..." to unstage)

     modified: GIT_TUTORIAL.txt
$ cat GIT_TUTORIAL.txtThis is my first GIT FileUnderstanding the DIFF command in git
$ echo "This is my readme file" >> README.txt$ git add README.txt
$ git commit --amend -m "My first commit & Understanding Diff & Add Readme.txt"[master 8ac8493] My first commit & Understanding Diff & Add Readme.txt
Date: Fri May 26 11:22:05 2017 +1000
2 files changed, 3 insertions(+)
create mode 100644 GIT_TUTORIAL.txt
create mode 100644 README.txt
$ git logcommit 8ac84931c3671d115cb8297612c7b7eb9b691653
Author: Rafael Possas <rafael.possas@sydney.edu.au>
Date: Fri May 26 11:22:05 2017 +1000
My first commit & Understanding Diff & Add Readme.txt
- GIT AMEND was used to combine everything in one single commit, this is useful when we want to have all our changes within the same commit.
- Another useful way of combining commits is the command squash. If you want to know more about it and other git history rewriting techniques please click here.
Some useful commands
$ git reset --soft HEAD^  #Undo last commit, put changes into staging**
$ git commit --amend -m "New Message" #Change the last commit
$ git reset --hard HEAD^ #Undo last commit and all changes
$ git reset --hard HEAD^^ #Undo last 2 commits and all changes